Ever find yourself needing to install the same packages on all your deep learning notebooks? Or maybe wishing you could send your exact setup to someone else who could run your notebook? Or perhaps you’re a corporation which wants all your data scientists to have some internal libraries on all their notebooks.
Turns out you can. GCP’s AI Platform Notebooks team offers Deep Learning Containers, which is a containerized version of the exact same images you get when you create a regular AI Platform Notebook (full disclosure: that’s my team).
And those containers are 100% free
Why would you want to use one? A quick list of benefits you can expect by using these:
- Ability to run these deep learning environments anywhere, including directly on your laptop
- Have your favorite libraries pre-installed by default. You avoid having to customize your notebook environment every time you create a new notebook
- Have a consistent environment used by all of your data scientists
- Ability to modify or replace the default Jupyter Lab IDE (if you really want to)
Below I’ll be walking you through the steps I took to create a Jupyter Lab container that lets you run Tensorflow with GPUs, but you can modify these instructions to meet your own exact needs.
Disclaimer: While my team offers the Deep Learning containers (among other products), I myself have never used containers before. So the below is the results of my first real experimentation and if you know of better ways to achieve what I’m doing please let me know in the comments!
At the bottom of the post are the key lessons I learned:
- Differences between DLVM images and DL Container images
- Some productivity hacks for working with Dockerfiles
Prerequisites
In order to follow along with the rest of the post I’ll assume you have the following installed on your computer:
- docker
- gcloud (optional)
Download a container
Let’s take a quick look at what containers we have available to us by running
$ gcloud container images list --repository="gcr.io/deeplearning-platform-release"
Currently that command outputs:
$ gcloud container images list --repository="gcr.io/deeplearning-platform-release"
NAME
gcr.io/deeplearning-platform-release/base-cpu
gcr.io/deeplearning-platform-release/base-cu100
gcr.io/deeplearning-platform-release/beam-notebooks
gcr.io/deeplearning-platform-release/pytorch-cpu
gcr.io/deeplearning-platform-release/pytorch-cpu.1-0
gcr.io/deeplearning-platform-release/pytorch-cpu.1-1
gcr.io/deeplearning-platform-release/pytorch-cpu.1-2
gcr.io/deeplearning-platform-release/pytorch-cpu.1-3
gcr.io/deeplearning-platform-release/pytorch-gpu
gcr.io/deeplearning-platform-release/pytorch-gpu.1-0
gcr.io/deeplearning-platform-release/pytorch-gpu.1-1
gcr.io/deeplearning-platform-release/pytorch-gpu.1-2
gcr.io/deeplearning-platform-release/pytorch-gpu.1-3
gcr.io/deeplearning-platform-release/r-cpu
gcr.io/deeplearning-platform-release/r-cpu.3-6
gcr.io/deeplearning-platform-release/tf-cpu
gcr.io/deeplearning-platform-release/tf-cpu.1-13
gcr.io/deeplearning-platform-release/tf-cpu.1-14
gcr.io/deeplearning-platform-release/tf-cpu.1-15
gcr.io/deeplearning-platform-release/tf-gpu
gcr.io/deeplearning-platform-release/tf-gpu.1-13
gcr.io/deeplearning-platform-release/tf-gpu.1-14
gcr.io/deeplearning-platform-release/tf-gpu.1-15
gcr.io/deeplearning-platform-release/tf2-cpu
gcr.io/deeplearning-platform-release/tf2-cpu.2-0
gcr.io/deeplearning-platform-release/tf2-gpu
gcr.io/deeplearning-platform-release/tf2-gpu.2-0
That’s a list of all the different environments available for you to choose from. You can see Tensorflow, Pytorch, R, and others on the list, and most of them come in both CPU and GPU variations.
We’ll take the Tensorflow 2 CPU image and modify it to create our custom environment. My goal here is to create a containerized version of an R environment with support for using GPUs with Tensorflow available out of the box. I previously walked through a script that does all this for you on a AI Platform Notebook, but that script took tens of minutes to run and who has time to wait that long for each of their notebooks?
This solution will hopefully get us to the point where we get both of those things available in two minutes.
Steps
You can follow along these instructions by cloning the https://github.com/ZainRizvi/UseRWithGpus/ repository and running the below commands from there
1. Create your image
We’ll create a super simple image first. We’ll use the Tensorflow 2 CPU image as our base and not change anything other than adding our own name as the maintainer of the new image.
To do this, create a dockerfile and give it the following contents
FROM gcr.io/deeplearning-platform-release/tf2-gpu
LABEL maintainer="Zain Rizvi"
Note: I named my dockerfile tensorflow-2-gpu.Dockerfile and put it under the “dockerfiles” subdirectory, and will be using that for the rest of my examples. But convention is to just name your dockerfile “Dockerfile”
Now cd to the directory that contains that file and run docker build . -f dockerfiles\tensorflow-2-gpu.Dockerfiles And Docker will download that image from the GCP repository, apply your custom label to it, and save the resulting image locally.
Note: If you name your dockerfile “Dockerfile” and place it in your current directory, you can skip the -f [filename\] parameter.
You’ll see something similar to the following
$ docker build . -f dockerfiles\tensorflow-2-gpu.Dockerfiles
Sending build context to Docker daemon 2.048kB
Step 1/2 : FROM gcr.io/deeplearning-platform-release/tf2-cpu
latest: Pulling from deeplearning-platform-release/tf2-cpu
35c102085707: Already exists
251f5509d51d: Already exists
…
928e12577c37: Pull complete
48d9ceba06f1: Pull complete
Digest: sha256:88ae24914e15f2df11a03486668e9051ca85b65f8577358e7d965ce6a146f217
Status: Downloaded newer image for gcr.io/deeplearning-platform-release/tf2-cpu:latest
---> e493f17c90d0
Step 2/2 : LABEL maintainer="Zain Rizvi"
---> Running in 561cbb80b0c5
Removing intermediate container 561cbb80b0c5
---> 8cee7adcf9c3
Successfully built 8cee7adcf9c3
Note the id in the last line Successfully built 8cee7adcf9c3. That 8cee7adcf9c3 is a local image id, and it will be important when we want to push our image (a couple steps down).
2. Push your image to a repository
To push your image, you need a registry to push it to. I’ll assume you’re using Docker Hub (which is free for public registries) but you can use whatever registry provider you prefer. For a Docker Hub registry you can go to hub.docker.com and create your public registry. You’ll need to create an account first though if you don’t have one already
Before the push, make sure you’re logged into docker from within the console (enter your password when prompted):
$ docker login --username zainrizvi
Now to push we need to tell docker which image it should be pushing to our new registry. We do this by tagging the image we built with the path of our registry and add an optional tag (yeah, the overload of the word ‘tag’ is a bit annoying).
Remember that image Id I told you to note earlier (mine was 8cee7adcf9c3), now is when you need that Id. We’ll tag that Id with the path to the repository we want to use:
$ docker tag [ImageId] [repo-name]:[image-tag]
Example:
$ docker tag 8cee7adcf9c3 zainrizvi/deeplearning-container-tf2-with-r:latest-gpu
If you run docker images you should now see an image with that repository and tag
$ docker images
REPOSITORY TAG IMAGE ID CREATED SIZE
zainrizvi/deeplearning-container-tf2-with-r latest-gpu 8cee7adcf9c3 4 minutes ago 6.26GB
However, just because we’ve tagged the image doesn’t mean it actually exists in the repository. We have to do a docker push to get it in there:
$ docker push zainrizvi/deeplearning-container-tf2-with-r
And now if you go to your docker registry you’ll see that the image is there for anyone to view and download
So that was cool, but we didn’t really do anything special. We’re not pre-configuring any of the packages we really need or anything like that.
Let’s now add some actual customizations to this image
3. Customize your image
Let’s extend this Dockerfile to support using Tensorflow with GPUs on an R notebook.
I’ve shared a few scripts on GitHub which can install R onto your AI Platform Notebooks, but those script takes way too long to run them every time you make a new notebook. Instead, I’d rather run the script in a container just once, and then save that container for future notebooks.
The scripts referenced below are chunks of logic I pulled out from these master scripts. You can read more about what those scripts do in this blog post on using R with GPUs . Splitting the logic into multiple scripts made this stuff much easier to debug (what problems did I run into that had to be debugged? I’ll tell you about it in a future post).
FROM gcr.io/deeplearning-platform-release/tf2-gpu
LABEL maintainer="Zain Rizvi"

RUN apt update -y
RUN mkdir steps
COPY steps/* /steps/
RUN chmod +x /steps/*

RUN /steps/1-Install-generic-dependencies.sh
RUN /steps/2-register-with-r-repository-ubuntu.sh
RUN /steps/3-Install-R-and-IRkernel.sh
RUN /steps/4-Install-common-R-packages.sh -m GPU
RUN /steps/5-Add-rpy2-support.sh
RUN /steps/6-Install-keras.sh
And now we can run docker build . -f dockerfiles\tensorflow-2-gpu.Dockerfiles again. This time the command will take a long time to complete (because some of those steps are sloooooow).
But once it completes, we’ll again be given a new image Id similar to the one we saw earlier. Just tag that and push it to your registry the same way we did before
$ docker tag xxxxxxxxxxxxx zainrizvi/deeplearning-container-tf2-with-r:latest-gpu
$ docker push zainrizvi/deeplearning-container-tf2-with-r
And now your image is available to use on your registry
Use your image!
To use your newly created image on AI Platform Notebooks:
- Go to the notebooks page -> New Instance -> Customize Instance
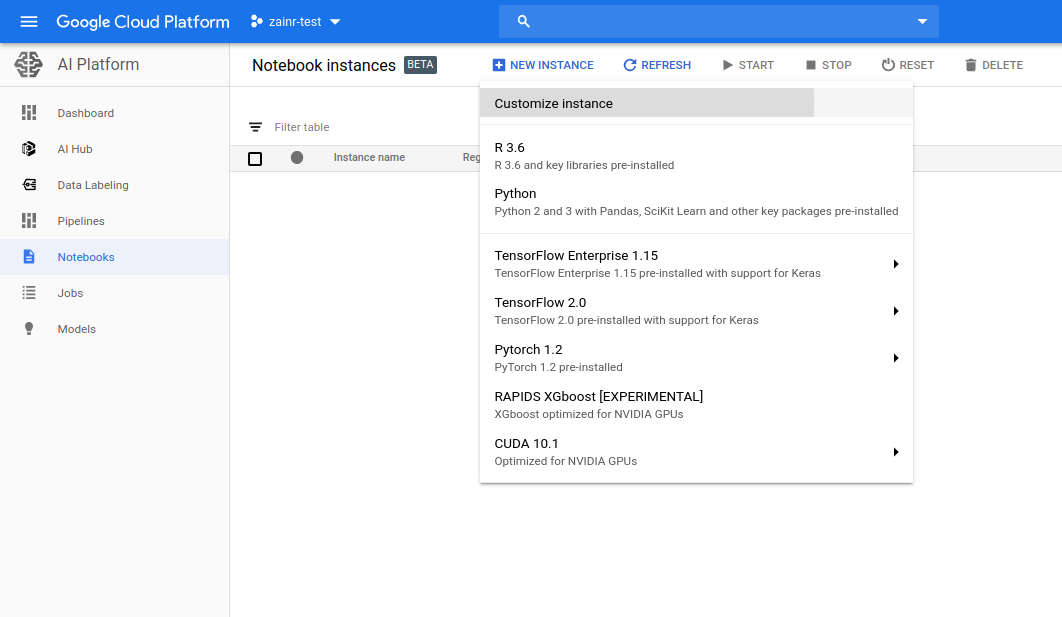
- Under the environment drop down select “Custom container”
Then in the “Docker container image” box enter the path to the registry you pushed your image to. Mine is: zainrizvi/deeplearning-container-tf2-with-r:latest-gpu
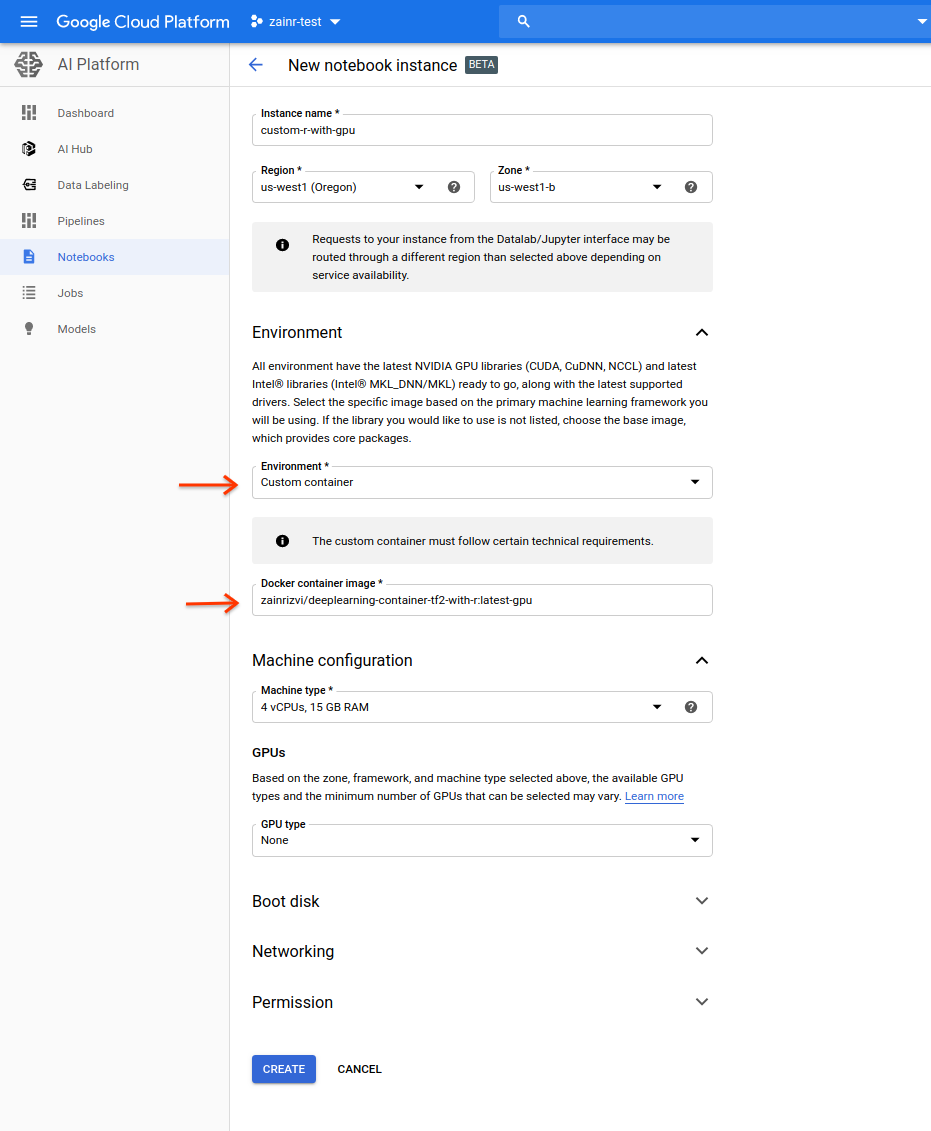
Click create, and in few minutes your notebook will be ready. You can open it up and see that TensorFlow is ready to go
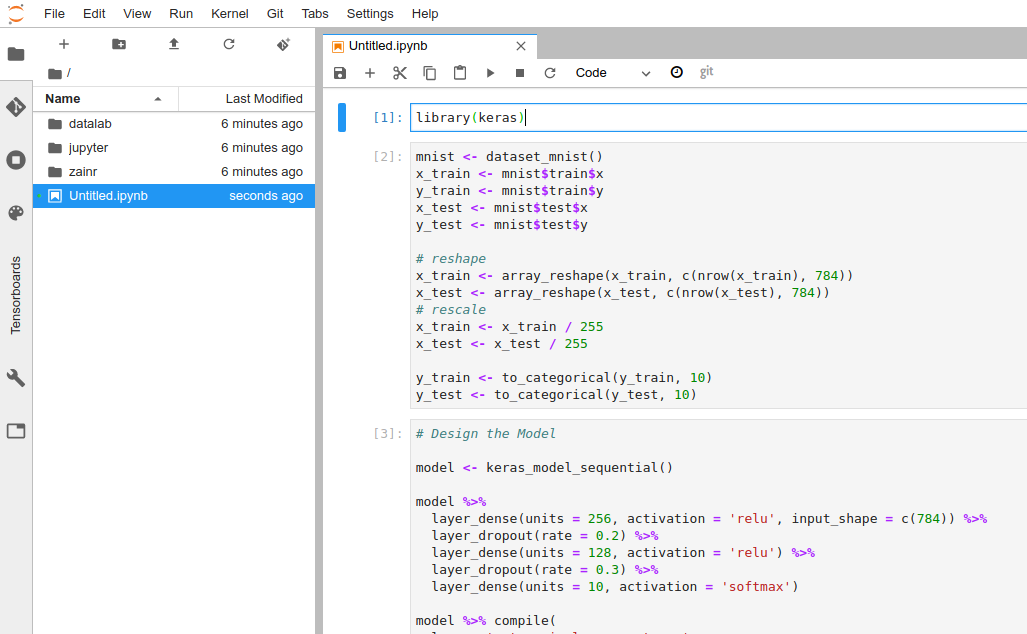
And there you go, you now have an R notebook that can run Tensorflow on GPUs!
It wasn’t all Roses and Rainbows
The more astute among you may have noticed that while the script I previously demoed was just, well, a single script, the dockerfile above contains six different scripts which seem to be the original script split into six parts. The eagle eyed may even notice that some parts of the script have been slightly changed, and that I’m no longer compiling XGboost.
Turns out the Deep Learning VM images and Deep Learning Containers are note quiiiiite 100% identical…
Key differences encountered:
- VM images run on Debian OS while containers run on Ubuntu
- Container images don’t the CUDA compiler installed, which is (surprise) required to compile GPU binaries. It contains all the binaries required for runtime though. Turns out those were omitted in order to reduce the size of the docker container.
- [mild] Containers get very confused if you give them a command that starts with “sudo”. Not a big deal since every command in a container runs as ‘sudo’ anyways
This led to a lot of time spent debugging what I had thought was a solved problem. (And did I mention this was my first time using docker containers?). Which led to…
Key productivity hacks discovered:
- In your dockerfile, split up your mega script into multiple smaller scripts. Docker will ‘cache’ the results of your previous, successful scripts and restart the build from the script that was changed (downside: this adds more layers to your docker image, but there are workarounds)
- Edit on the go: If you setup docker hub to pull your code from github and build the image, you can make minor 1-minute fixes from your phone directly on github, commit, and go about your day while docker hub starts a new build run (which may take 2-4 hours to complete…Docker hub is slowwwwww. But it’s free, and enables this nice productivity hack)
If you’d like to hear about the craziness I encountered debugging this image (it was over 7 hours of debugging + waiting for scripts to run), sign up on the form below to get an email when that article comes out.